Lap dogs

Apparently I’ve started a new tradition for myself. Last year I did the exact same thing on a Sunday evening — put bacon cheeseburger soup in the crockpot, officially switched my pandora station to Christmas music and decorated my tree. (I should also mention that this was last Sunday evening. I’m apparently a bit behind…)

I also took it as an opportunity to trial-run some Christmas photos with Hurley. He’s not super impressed, but my goodness does he look handsome!

Hurley Xmas

This is probably my third attempt at bacon cheeseburger soup (and heaven forbid I use the same recipe). Hands down, this was definitely my favorite rendition of it. It’s cheating a little since I technical combined two recipes. I started with this recipe as the base and incorporated parts of this one to avoid using half-and-half. It could also be because I used italian sausage instead of ground turkey since it was on sale, and I also used a block of cheese as opposed to shredded cheese. I’ve also decided the sliced carrots are the way to go, and celery was a great addition, too.

Regardless of what made this the winning dish, it was delicious!

Cheeseburger soup

The rest of the week was a blur between work and also trying to learn more about a board of directors. As part of my 30 Before 30 list, I went to a board matching event on Veterans Day. It’s more or less a speed dating approach to meeting nonprofits in the area. I really connected with one director who runs a programs for women experiencing homelessness (double win!), so this past week I not only attended a board meeting but also their big fundraising event. It seems to be a promising match, so stay tuned!

Then more excitement came — I’m a doggie aunt again! Meet Millie Vanillie Bean (to match her older sister Mocha Jo).

Millie

I seriously can’t get over how small and light-weight she is! It’s also strange to have to watch where you’re walking. Hurley’s pretty present (especially in the kitchen), but this 5-month old girl is so small that I’m afraid I’m going to step on her. You can barely feel her resting her head on you or standing on your lap. That will change as she grows (and I know all too well that goes with my little bear) so I’m taking advantage of it while I can. I think it goes without saying that Miss Millie will grow up surrounded by lots of love and cuddles, not to mention some fun-loving labrador mentors. ❤

Hurley hasn’t met her yet, so we’ll see how he reacts to the news. In the meantime, I’ve kept him busy with holiday photos. He was surprisingly better this year than he was last. It only took about 30 minutes tonight, which may as well be a record for us. When he sat on my lap and gave his aunt this look, though, I knew he was done.

Screen shot 2015-11-22 at 9.46.02 PM

I also confirmed he’s not a fan of his jingle bell collar… At least it’s just a once-a-year event, right? And it pretty much secures his place on the nice list (though I’m probably a bit really biased when it comes to this guy).

Needless to say, we’ve officially kicked off the holiday season in our household!

Blood, sweat and tears (quite literally…)

August was apparently a big month for me in terms of completing projects. After I finished my big evaluation report for work, I used the couple of days I took off to focus on finishing up the never-ending DIY project.

This is by far the largest DIY project the middle and I have taken on to date. And I should be clear right up front that this would not be complete without her. It was a true labor of love that tried our (but mostly my) patience every step of the way. If she weren’t my voice of reason, this would very likely be in pieces at a bon fire. There were points where it got that ugly.

But let me start back at the beginning.

When my parents downsized earlier this year, they decided to get rid of my mom’s crafting table, which was previously our family dining room table. I’d always loved the gorgeous pine wood and figured I could spruce it up a bit for my own dining room. (I tried to find a photo of our original table, but most included unflattering photos of the middle and I’m not about to make those public given how much she contributed to this project).

My mom has also been intrigued by painting furniture, so she decided to paint it blue before passing it on to me given how worn down it was.

full before

Normally something like this would work in my house, given I have a pink entertainment center, a teal desk and love color. Thanks to Pinterest, though, I fell in love with a particular style. The minute I saw it, I knew that’s what I wanted. This was a close second since it would match the style of my table a bit more.

And thus the project began. The weekend after Memorial Day weekend, the middle and I started the process of stripping paint – which let me tell you, takes a hell of a lot longer than I thought. All I can say is thank goodness for the middle. She searched which type of paint stripper was best, so at least we had a fantastic product. (Seriously, if you ever need to strip paint, which I hope to never do again, buy this. It doesn’t burn you at all or smell terrible).

For the first round we lathered the paint stripped all over the table and chairs, covered it with garbage sacks and let it sit overnight. (We also did her wine rack too, which took considerably less time.)

Paint stripping

Initially we were excited by the results. Peeling it off was actually kind of enjoyable, particularly when we could see the wood coming through — even under the original blue of the chairs.

Round 1

Unfortunately, as the day wore on, I became substantially less excited. There were areas the paint stripper dried, making it difficult to make much progress. Also, trying to strip paint off a table top, four table legs and six chairs in one afternoon? Not at all smart on our part… Lesson learned: take it one or two pieces at a time.

Over the next few weeks we continued to chip away at the paint, trying to get as close to the original wood as possible. It helped to have the spray-can version of the paint stripper. We’d lob it on a section of a chair, wait a couple minutes and then keep peeling away. We also tried another brand of paint stripper, but given the number of times I burned myself even using gloves and trying to be careful, it wasn’t worth it. The orange wonder seemed to do the trick on it’s own.

I won’t lie that I had a handful of weak moments where I thought about just buying new chairs for the table. Having to deal with this level of detail (particularly on the chair legs and the design on the chair back) was just too much. So many curves and crevices. Plus it was incredibly messy (I will say mineral spirits helped with that a bit). And this was just phase one!

chair back

chair side

Somehow after a few weeks (probably because of the middle…) we prevailed. We’d reached a point where we’d stripped about all that we could, signaling it was time to move onto the next phase of the project: sanding.

Ready to sand

The middle also saved the day in borrowing tools from her boyfriend’s family so we could have two electric sanders. I don’t even want to imagine what it would be like trying to do it by hand with sheets of sanding paper.

I’ll be honest that I lost a little motivation during this phase. Especially with the detailing sander, it took a lot of focus and I felt like I wasn’t seeing any real progress. It was exciting to see the wood smoothing out so well, though.

Sanding detail

At this point we put the table on hold for awhile. I knew, though, that we had to finish the project sooner rather than later (if only because my sister and her boyfriend would want to park in their garage at some point…). My motivation perked up again when the middle sent me this picture while I was on my way back home from my training in California that first week in August. Isn’t is insane how much difference sanding can make?!

anded table

And with that, it was time to start priming. The middle even created a great corner to make sure I could spray without ruining anything in her garage or the driveway (which I may have done during the paint stripping phase…).

Priming

Naturally nothing with this project was easy. After spending a full afternoon taping around the spokes of the chairs and covering the seats (to avoid getting any paint on the wood we planned to stain), I loaded up the paint sprayer and was ready to power through priming. Except nothing happened. In 50 minutes all I managed to accomplish was two strips of wood on the bottom of the table top.

I called it quits, coming back the next day with a new paint sprayer. Long story short, that sprayer was a bit too powerful (one of the chairs is a lasting reminder of that…) and thankfully the old one started working. In the course of an afternoon, I knocked out all the priming. Finally it felt like I was seeing progress!

(And as I did with my entertainment center, I’ll put in a plug for paint sprayers. Absolutely worth the investment, especially on projects like this!)

Primed

That weekend was also when I narrowed down my paint options. Guys, I had no idea how many shades of off-white there were! It was incredibly overwhelming. I knew I didn’t want any color tint to it (gray, blue, pink, etc.). I also didn’t want it to be too beige or tan, since the wall color in my living room borders on a creamy yellow. Plus my two sources of inspiration had pretty crisp white.

Finally I settled on bone. I won’t lie — I had my doubts once it was painted. It was was a bit more white than I intended, though the middle mentioned that perhaps doing a gray or cream primer may have helped make that more subtle. (I say that like it’s a tip to remember in the event I’m ever crazy enough to take on an endeavor like this again.)

Selecting a stain also proved to be a struggle. I didn’t want to go too dark, since I already feel like the wood in my house is overwhelming dark. But I wanted something that had just enough contrast to the white. After three trips to Menards, I finally found a shade I liked: hickory.

That brought on it’s own moment of panic. The stain I loved was a gel stain, which I’d never worked with before. (To be honest, it’s not like I’ve worked with much stain anyway. I’ve only done my coffee bar and that was under the supervision of a pro…). And the employee just kept saying, “It’s all about what you prefer.”

I decided to be brave and run with the gel. We started by putting a pre-stain on all the furniture. Then came painting on the gel…which promptly resulted in me googling tips for applying gel stain. The directions said to wipe the excess after three minutes, but that resulted in a not-so-ascetically-pleasing (read: ugly) finish. We (and by we I really mean I) almost scrapped the gel stain idea, but I’m thankful I didn’t.

One tip that helped is the comparison that liquid stain is like spreading butter on toast. Gel stain is like spreading peanut butter on toast. So long as we had the right consistency, we didn’t have to wipe the excess after three minutes.

About an hour later, the staining was done. And that’s when I really fell in love.

Half chairs stained

Chairs

In the next day or so, we made final touch-ups to the stain and the white paint on the spokes near the seat. I will say that if you’re ever in this type of predicament, definitely paint before staining. It might have even been that day that we polyurethaned all the chairs (all the days of working on this project started blending together after while). But finally, something was done! So we celebrated.

celebrate

We saved the table top for the very end. This is where staining really counted. I’d feel okay about screwing up the bottom of the table or even one of the chairs. But the table top is really where I needed to bring my A-game.

light top

Once the stain dried, I was a bit anxious when I saw how streaky/uneven it was. The middle used some mineral spirits on it the next day, which helped a tad. We also applied a second coat, which seemed to even it out quite a bit. Finally, a week and a half ago, the middle applied the polyurethane to the table top. There was no turning back!

final table top

This past Saturday morning I applied the final coat of polyurethane to the table. The final step should have felt substantially more rewarding. Why was it not, might you ask? I discovered a flaw in my plan. Googling confirmed that, unfortunately, oil based polyurethane will turn white paint yellow.

Yes, you read that right. White paint will turn yellow, which is exactly what happened to my chairs.

I kid you not, I about broke down in tears right then and there. I reached the finish line, but it wasn’t the table I’d worked so hard to rehab. But I was also the first to admit I was burnt out on the project and no way in hell was I started over on those chairs.

Thankfully, the lighting in my dining room is dark enough that you can’t really tell it’s yellow. It looks more like the off-white I’d been envisioning, though I’ll likely reassess whether I want to repaint it when I move at some point in the (hopefully not so immediate) future. But I still have to admit it looks fabulous in my dining room — especially with my newly created canvases!

final

final 2

I love the burst of white in my dining room and the contrast the stain has to the white (well, technically yellow…). It definitely matches the look I was going with, so I’d consider this a major Pinterest win (minus the yellow, of course).

And just a few more photos for good measure — is this transformation not amazing?!

Chairs Before and After

Table Before and After

Pinterest photo

With that, I’m retiring from DIY projects for the time being. As my mom jokingly says, it’s been real, it’s been fun, but is hasn’t been real fun. But I will say I am pretty damn proud. (And another big shout out to the middle!) I think this ups our DIY cred.

Ladies night

This is probably a clear sign that I’m getting older, but given how energized I felt after a night of crafting, I’ll take it.

Last night a friend and I decided to have a girls night focused on making a canvas. It’s been something we’d talked about doing for months, and now we’re hoping to make it a monthly event (just in time for holiday crafts!). It was also nice to discover my canvasing skills weren’t too rusty. It’s been probably a year and a half since I’ve made any type of canvas.

We started with dinner — pizza in a crockpot. What was nice is I was able to whip everything up and throw it all in the crockpot before we ran to the craft store. As usual, I used ground turkey instead of ground beef, and I nixed the green peppers. I did throw in mushrooms and black olives, which are typically staples on my pizza. I toyed with the idea of throwing in pineapple but decided against it.

I also made a homemade sauce, using this recipe as a starting point. Of all the foods I’ve made, I’m fairly certain that pasta sauce is my favorite. There’s something magical about it (strange, I know). It’s different each and every time, but it always turns out delicious. And naturally we paired the pasta with some garlic bread.

Crockpot pizza

Next time I make it, I’d probably mix the noodles with the sauce prior to putting it into the crockpot. Although my leftovers may chance that approach. Having the sauce on top of the noodles instead of mixed in, I find, doesn’t dry the sauce out as much for leftovers. We’ll find out tomorrow!

After dinner it was time to get down to business. Before dinner we’d spent roughly an hour at Hobby Lobby trying to figure out what to make. Initially I was just going to mod podge a collection of calendar quotes that I had. Seemed like an easy way to get myself back into the canvasing game (plus I really need to do something with the stack of quotes on my desk…).

But then my brain went into over-drive, as it tends to do when I’m in Hobby Lobby. Plus I had Pinterest loading tons of sample DIY canvas projects. It took some time, but finally I settled on something for the dining room, using these as inspiration:

Inspiration

The color scheme came together a lot easier than I thought. I’d been wanting to incorporate more of an olive green into my house, and the blue helps tie into the living room rug. Plus these two colors offered such a nice contrast to each other.

Crafting

It was the writing part that worried me the most. I’ve used paint markers on a canvas with mixed results, and I didn’t trust myself to write it out with a paint brush. Thankfully in the aisle was an acrylic dimensional writer. It’s similar to paint you’d use on a shirt. After a few trial runs in pencil, I decided to just go for it.

Around that time, Hurley decided to join the party. The poor guy gets anxious during thunderstorms, so I had a sidekick for awhile.

Hurley

What I love about these projects is how quickly they can come together. The paint dries relatively quickly, so I was able to hot glue gun the letters on before going to bed (which these letters coincidentally spell out). I woke up this morning and fell in love with the canvases all over again.

Canvases

I may go back with the hot glue gun again or maybe even super glue to make sure the letters are really bound to the canvas. Once that’s done, though, I’ve got the perfect spot for it in my dining room. I’m itching to hang them up but know I need to be patient…

I’ll be sure to post more photos in a week or so. I may even have a photo of the canvases my friend was working on, too, since I loved her concept. More importantly, though, in a week I should be able to showcase the DIY project that middle and I have been working on (for what seems like forever now…). I literally am giddy about starting one of the last two tasks today!

Thankful Thursday #18

If there’s anything I’ve learned in the last week, it’s that mother nature always wins and it certainly has a way of putting things back into perspective.

My adventures started last Thursday. I’d been traveling for work and was more than ready to head home to my furbaby. Mother nature intervened. An hour before we were supposed to board, an announcement came that an incoming flight (the plane we were supposed to take) was struck by lightning. It was re-routed and they weren’t sure when it would arrive in DC.

As the hours passed, we realized there was no chance we’d make our connecting flight and nothing could get us remotely close to Lincoln. We retrieved our luggage to head back to our hotel for another night. Although I was beyond disappointed, I also felt a little lucky. I wasn’t on a plane that was struck by lightning. Could you even imagine? And instead of spending the night in a terminal, I got to go back to a hotel and had great conversations with my co-workers over a much-needed beer. The experience definitely bonded us in a way that nothing else could have (including the contagious giggle fits the following morning as we got more plane delays).

When we landed, I can honestly say I’d never been more thankful to be in Nebraska — particularly since the middle picked me up at the airport with a fountain pop.

Perhaps because of my long stint in the confined terminal of an airport for 12 hours, I ended up coming down with a head cold Saturday night. I honestly don’t know the last time anything knocked me on my ass this hard. Even today I’m still carrying around a box of Kleenex and Sudafed.

I’m not entirely sure mother nature is to blame for that one, but it was definitely a fluke thing I had no control over. I had no choice (quite literally) but to curl up with Hurley and give my body the rest it needed. No work (though I tried until my boss sent me home), no workouts, no nothing. There’s never an ideal time to go get sick, and this week was no exception. Somehow it was what I needed, though. (Now if only my voice would go back to normal…)

Speaking of Hurley, my big moment of thankfulness occurred last night. The middle closed on her new house last Thursday and we’ve been painting ever since (though she’s been burning the midnight oil way later than me).

Last night storms were in full force. As we were upstairs painting the spare bedroom, we were literally just having a conversation about how storms aren’t as fun and exciting when you’re an adult (in part because I’ve got an anxious dog) when we heard the tornado sirens. Dropped jaws and silence.

Why am I thankful? This is the first time we’d been painting at her house and actually had the dogs with us. Also thankfully, we only had torrential downpour, crazy lightning and loud thunder. (Although a house just a few blocks north of her was struck by lightening.) Tornado or not, you can bet one of us would have been in the car trying to get to the pups.

They weren’t to keen on the sirens or being confined to the basement, and they definitely weren’t crazy about the weather. But they were safe and with us. And after awhile, the babies were sound asleep.

doddies

Mother nature certainly makes you stop and count your blessings. When you realize how much control you don’t have in life, you appreciate the good fortunate and luck you do have.

Intentional living space

I’ve been somewhat quiet about my word for the year, though I can assure you it’s not because I’ve forgotten about it or put it on the back burner. I’d be lame and say it’s because I’m trying to be intentional about what I post about my pursuits, but that’s not the case either.

Having to move did throw me for a loop in terms of kicking off the year. The things I thought I would get to focus on in terms of intention (time and energy were the big ones) fell to the wayside a bit. But it’s also been a perfect opportunity to be intentional about something a little different — and something I probably wouldn’t have considered otherwise. Right now I’m trying to be intentional about my living space.

Last week I took a community education class on feng shui, which was actually my second class on it with the same instructor because I find her so engaging. Plus it’s an interesting way to think about home décor and de-cluttering. One of the big points she stressed (though I’ve heard it elsewhere before) is that everything in your house should be useful, sentimental or beautiful. When I walk into my house, does it feel like home? Does it reflect me? Are there any items that spur negative emotions (the example the instructor gave is high school year books if you hated high school) that I can toss or donate?

Despite purging quite a bit last year when I moved to Lincoln, it’s ridiculous how quickly stuff can accumulate again. And thankfully this time around my level of sentimentalism (if that’s even a word) has decreased a bit since my move this time is 5 minutes instead of 5 hours. I can be more intentional about what stays and what goes. Have I actually used all my clothes, kitchen items and crafts in the last year? Am I honestly going to look through my economics or foundations of new governance notes again?

Those tend to be more rational questions, though. This time (although I’ll preface that it sounds a bit new age….) I’ve been aided by what I learned in my feng shui classes and The Life-Changing Magic of Tidying Up to focus on how I feel about objects. (Again, I know it sounds strange.)

As an example, though, I love my custom-built kitchen counter (hello new coffee bar!) and my entertainment center (which will likely become a new color in the next couple weeks). Those are pieces that were crafted with hard work and family, that are specific to me and what I love. You couldn’t pay me to give those things up in the move.

But there are also items that I’m not crazy about or that don’t necessarily bring out those positive emotions. That’s where I’m trying to be more intentional about sending them on their merry way.

With seemingly perfect timing, just a couple days ago someone on facebook posted a #40bagsin40days challenge. I immediately decided to embark on it to help with this process. Not only will it help me with packing and setting up my new house, but it will also help me accomplish my 30 Before 30 goal of going through my photos and computer files. The focus of just one area a day (though the next few days are about to get hectic with that), helps me take baby steps and not feel so overwhelmed with all the clutter (though it’s primarily the electronic clutter that’s driving me nuts). Just yesterday I whittled my work inbox down to nine emails. NINE!

But I digress.

I think part of the reason I was so resistant to moving is that I love what my home became. For the first time since leaving my parent’s house a decade ago, I feel like my living space finally reflects me and the things I love. But my hunch is that will happen much faster in my new home. I’ve been given another opportunity to purge and be intentional about what goes where — with more space and a sunroom!

your home

If only the long process of packing and physical moving didn’t come first…

New pride and joy

I have been anxiously waiting to blog about my new pride and joy (no offense to Hurley)!

My entertainment center used to be my favorite piece of furniture in the house. And how could it not be given how the pink stands out and the blood, sweat and tears the middle and I put into it one weekend? But this weekend I finally got to put in a new favorite. Like I’m seriously in love with this thing. I grinned like an idiot each time I saw it.

But first, the back story.

One of the minor downsides to the house I’m renting is the kitchen is relatively small. When I toured it, the owners had a table that gave them more counter space. I knew I was going to have to do something similar since I not only need the counter space, but also the storage space (my food processor, crock pot and extra coffee items were being stored on the stairs leading up to my attic… Whatever works, right?).

I wanted to find something that fit the space, which proved to be a difficult task. There was also an added problem in that I didn’t just want a folding table because I preferred built-in storage. And naturally everything that seemed like a remote possibility ended up being too big, too expensive or just didn’t fit my style.

Enter the middle’s boyfriend’s uncle. He became my favorite person in Lincoln.

About a year ago Uncle Buck made the addition to the middle’s old entertainment center to convert it into a wine rack. The middle said he might be willing to create a counter for me, so I jumped at the chance. After I found a few options on pinterest that caught my eye (this was the main inspiration), the middle create a fantastic 3-D graphic with the dimensions and handed it off to the craftsman to work his magic.

Two weeks later, I had this baby.

counter1

Gorgeous, right?! I swooned. But it gets better.

A week or two later I got to stain it. The oak wood looked so gorgeous with the special walnut stain (that’s just the name of the stain — it’s not specially made or anything). Although I thought about trying to find a stain that matched the kitchen and wood flooring, I decided to instead just find a color that I liked. Chances are this counter is going to be with me far longer than my rental home.

After applying a few coats of polyurethane last Monday night, I had a long waiting period for it to dry (thankfully I was out of town for work so that distracted me pretty well…). Then Thursday evening, I got to pick up my new piece of furniture.

craftsman

Ever since then, I can’t stop admiring it. In part it’s because I’ve been trying to figure out what works in terms of functionality and looks. I’m in search of a placemat to put under the microwave, and may do something similar for the fruit bowl (I’m super protective of the wood surface). The baskets were a lucky find on Friday night. I got the last three at the store AND they were on sale!

To say I love it is an understatement. And I’m not joking when I say it more than doubles my counter space. That alone is worth it (though I refuse to prep any food on it just yet. Like I said, being super protective…).

Kitchen

Mostly, though, I love that it breaks up all the white and makes my house feel even more homey. Between the entertainment center, dining room chairs, pallet shelf and now the counter, it’s definitely a Liz house. Lots of color and uniquely created home decor. And the fact that it’s all functional and aids in my Type A organization doesn’t hurt either.

Seriously. Just look at this hand-crafted beauty!

counter

A huge thanks goes out to Uncle Buck. He and his wife were so welcoming throughout the whole process. Plus, in addition to creating this masterpiece, he stuck with me through the final steps (it was my first time staining, which I discovered I prefer to painting) and was so wonderful to spend time with as I worked on the finished touches in his garage.

Lucky for me that not only did I get a fabulous product, but I also got to know fabulous people. Does it get better than that?

Labor Day laboring

I’m typing this entry from the comfort of my newly recovered dining room chairs. But first, the before photo.

Table Before

It’s not that it’s a bad table per say. It was a solid $100 investment for my apartment during graduate school. But the cream/white chairs were never going to last with me around, and they left much to be desired in terms of comfort. In fact, I normally put a fleece pillow on top of the chair if I anticipated sitting for more than 10 minutes.

Recovering them has been on my to-do list since I moved almost six months ago (it’s hard to believe it’s been that long already!), but I was torn on color. With a pink entertainment center, a light blue rug and an orange coffee pot, I felt like I had to be somewhat careful in my color selection. Although I went into the store with the hopes of finding a slate blue/gray color, it was inevitably a purple that caught my eye. Then the middle had a genius idea — do two chairs purple, and the other two the chevron pattern just a few rows up from the purple. Yes, please!

I also bought 2 inch cushion foam to add more support to the chair. We anticipated scrapping the old foam but decided to keep it on the chair for two reason. One, it would definitely offer more comfort. Two, the foam was already wrapped around the wood base of the chair, meaning we wouldn’t have to worry about getting the new form around the wood, which would save us time (and headaches).

Once the foam piece was squared away, next came the task of figuring out how to effectively wrap the fabric around the foam. Essentially the middle treated it like wrapping a Christmas present. And I had the honors of using the staple gun to secure it in place. (Let that sentence sink in for a minute. A staple gun, people! I got to use one!)

You can tell there’s more padding on the chair now, and the comfort alone is worth the size difference. Plus the patterns are so fun!

Before&After

The entire project took us* about two hours.

*By us, I really mean the middle. She did the staple removal from the old covering, the fabric wrapping job for the new covering and screwed them back on to the chairs. I mostly just used the staple gun and provided lots of witty commentary.

The transformation was much needed and already my dining room feels even more complete (I’ve been putting off hanging any wall art on the open wall because I wasn’t sure what color my cushions would end up being). Not bad for a four-hour $50 project!

Table After

Like I mentioned, I couldn’t have done this without the middle, though. Clearly Hurley wasn’t going to be much help…

Hurley Help

With that project marked off my to-do list, I’m just about ready to tackle my next DIY project. Here’s a small hint — it involves a sander (another big tool I’m really excited to use!) and teal/turquoise paint. Oh, and the middle. I still need supervision for most projects requiring tools…

Copy-cat alert

I failed to mention (although it was intentional since the post was already getting pretty lengthy) that while the middle and I were making over the entertainment center about three weeks ago, we also started upgrading a pallet (lots of squats, people).

Awhile back the middle turned a pallet into a media stand. Naturally, I wanted to do the same. Not only is it functional, it’s beyond super cute and matches my home decor taste. She was able to get me a pallet that already had shelves built in and I happily took it back to Columbia nine months ago. And there it just sat. Unused. Unpainted.

Since I was already sanding, priming and buying paint for the entertainment stand (and more importantly, had the help of the middle…), it made sense to (finally) get the pallet done as well. Or at least started, since I ran out of steam nearing the end of that weekend.

pallet

(In retrospect, I should have taken a photo of the other side of the pallet since that side had the shelves…)

The middle and I were able to sand and prime, and the following weekend is when I got it painted. And once again the paint sprayer proved to be a lifesaver. It took no time at all to paint — it was the drying that took up a bulk of the time that afternoon.

While I was tempted to go with another color that popped (I was leaning toward a turquoise and for some reason I’ve been obsessed with orange lately), I figured I would need something a little more neutral. Plus I was much more likely to keep this piece in the coming years compared to my entertainment center, and gray was likely to be a pretty universal option.

To say I was eager to get it into my living room is an understatement. It’s a little larger than the angled wall it sits against, but it makes things feel so put together. And it looks so homey and fantastic just a few feet away from the entertainment center.

Painted shelf

It doesn’t have much on it yet (I’d been holding off on blogging about it since I thought the nester in me would have it filled up within a day or two) and I’m sure once it’s full it will look even better. Part of my struggle is that while I intended to put my DVDs on it, I love the line of movies on the bottom shelf of my entertainment center (which I’m still obsessed with). I don’t have too many knickknacks either, so we’ll see what I’m able to come up with in the coming weeks.

In the meantime, I’ve already diverted my attention to strategizing a few other DIY home decor projects. This fabulous weather may distract me from wanting to work inside, though!

A pop of color and lots of squats

The last few weeks have been a whirlwind, to say the least. I finished up with my previous job, and literally 24 hours later we were closing the back of the rental truck to hit the road. Thankfully I’d given myself a week off to decompress and unpack before I jumped into a new job.

Two minor problems with that. One, I’m not good at sitting idle (even the guy giving me the tour at my potential gym laughed that I was already gym shopping just three days after moving). Two, I’m a nester. Any free time means I’m trying to find ways to make my new place feel more like home.

By the second day, I was feeling uneasy about my “entertainment center” (if you can even call my old coffee table that). I deserted my old one in the move knowing I wanted to refurbish a dresser (and there wasn’t much room to spare in the rental truck…).

While I knew I would find a replacement piece in the near future, it was driving me crazy. That was the one area of my living room that didn’t look at least somewhat put together. Actually, it looked more like I just moved into my first apartment, and I hated that feeling (in part because I’ve been living in non-student housing for eight years now).

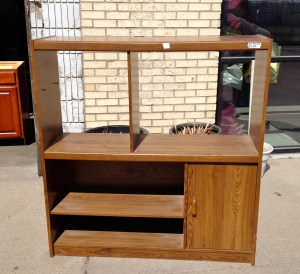
Finding an entertainment center became my number one priority. Friday afternoon the middle and I went to the EcoStore to scope out some options. Right when we walked in, we saw my new addition. And in the $5 section, no less. Five dollars!

before

What’s even more fitting is that it looks eerily similar to the entertainment center the middle upgraded just a few years ago (and thank goodness she already knew what she was doing!) before turning it into a wine rack.

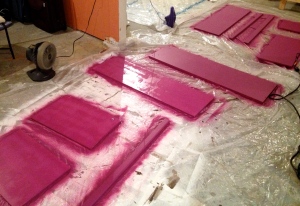
We followed the same process to give it a makeover — sand it (takes about an hour), prime it (took a couple hours) and finally paint it.

I do need to throw in a plug for our newest investment. The middle, having been through this before, thought we should consider getting a paint sprayer. I am here to tell you that it is well worth the investment! Although it wasn’t effective in that there’s one sprayer and two of us, it allowed us to alternate (believe me, you need a break after all the squatting…). Plus it seemed to be much more cost effective in terms of the paint. The whole entertainment center took half a gallon of paint for three coats, whereas when the middle did hers, it took a full gallon.

paint

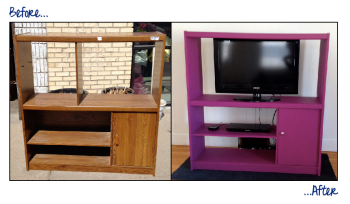
About 27 hours later, the project was complete (albeit the assembly took a bit longer than we anticipated. It’s slightly harder when the pieces aren’t marked and you have three sets of two nearly identical pieces…). But look at the difference a little paint and a new door knob make!

Before and After

I should probably explain the color choice a bit. The inspiration for this project actually came from one of this middle’s friends. She has a pink dresser-turned-entertainment-center that I fell in love with, and for some reason I couldn’t shake the idea of having a pink piece of furniture. And color was something I was in need of for that side of the room. Because of the texture of the wall behind my TV, I can’t hang any photos or canvases. In addition to wanting something that popped, I needed something to match the purple circle canvas I made almost a year ago now. This turned out to be the perfect complement.

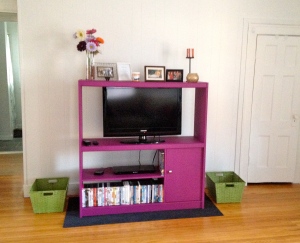
What used to be an eyesore for me is now my favorite part of the living room! I just wish the photos did it justice…

final

A few of my favorite things

This has got to be one of my favorite craft projects, especially as a meaningful gift. I’m absolutely going to be making more of these in the future. And to anyone else who wants to make one, hit me up!

As I mentioned earlier this week, Lindsay is starting a new job next month. Her last day at the office was today, actually, and I don’t think it’s fully hit me that she won’t be there when I get back after the new year. For the last two and half years she’s been my other half and rarely is there a project that I don’t have her right next to me to brainstorm, write/edit and get super giddy about data. Plus we’ve been through a lot together, professionally (presenting at a national conference!) and personally (many a life chat with this lady). It’s going to be weird not starting each work day with my work wife.

Given all of that, I wanted to give her something a little sentimental for Christmas. Ideally I also wanted it to be something she could put in her office. For the last two years, our bulletin boards and picture frames have been filled with photos of us (I promise we’re not vain or self-obsessed!) so when I spotted a monogram photo collage on pinterest, I had my answer (minus the minor fact that my one experience with mod podge did not go well, so I had to enlist the help of another friend).

It was actually really fun trying to organize and arrange the photos. Although I definitely realized we take more selfies than anything, which posed a few challenges with the small space of the L. Thankfully I had a nice mix of photos over the years to make it all come together. And now Lindsay’s always got a little bit of me in her new office!

Ls

It wasn’t until I saw the finished project that I decided to make one for the middle as well and give it to her tonight so her SO could also see it (and waiting until Christmas would disrupt the equal number of presents for distribution). Initially I hadn’t planned on making this since I ran the L monogram idea by her and she seemed indifferent about it. But I figured if she didn’t like it, I sure as heck would keep it. I love my little doggie niece!

This one was a little harder to craft because of the angles, but I’d say it turned out to be pretty adorable. Although I will confess that it was hard to pick just a handful of photos to include. And looking at them all made me want to squeeeeeze her. She’s such a cute little cuddle bug!

mocha

I wish these photos did the monograms justice, but you’ll have to trust me on this one. One downfall, at least with the wood letters I purchased, is that there’s not an easy way to hang it. I’m sure if I put more thought into it I could come up with some type of solution, but my brain is fried after two busy weeks. Plus it would look just as great propped up on a desk or bookshelf.

(Normally I’d include the middle’s reaction to the gift, but I cheated and had this post drafted earlier in the day and scheduled to post, knowing full well that once I reunited with the middle and little tonight, I wasn’t going to want to take time out to blog. But I couldn’t wait to share this successful crafting endeavor!)

Categories

Enter your email address to subscribe to this blog and receive notifications of new posts by email.

Join 240 other subscribers